Uncategorised
- Details
- Written by: Pumbaa2
- Category: Uncategorised
- Hits: 309
Table of Contents
- About this site and inspiration to help the community
- Pre-Requisites
- Pro and Con's of Official Instatalation Methods
- Official Installation of Home Assistant
- Advanced Users Installation of Home Assistant with Supervisor
- Details
- Written by: Pumbaa2
- Category: Uncategorised
- Hits: 485
Sonoff RF Bridge (433Mhz)
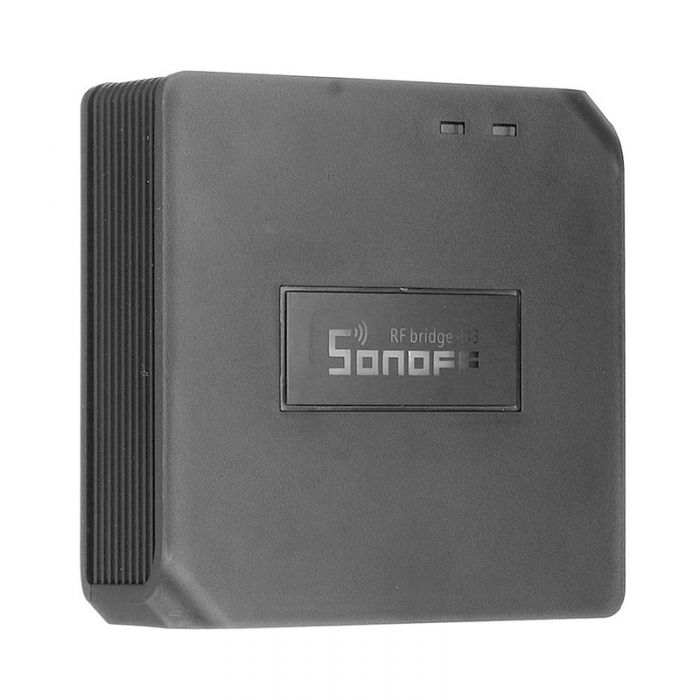
This device flashed with Tasmota will allow farely seemless integration into Home Assistant using a MQTT Broker. This device will allow you to integrate various 433Mhz Sensors, Buttons, Outlets, etc. Using Tasmota, you can control and listen for messages from an unlimited number of devices within reach of this device. All these events can be configured in Home Assistant to turn on lights, ring door bells, or whatever your automation needs are.
Configuration
Pre-Requisites:
- Tasmota has already been flashed onto the Sonoff RF Bridge
- You have a working instance of Home Assistant
- Your Home Assistant Instance is already linked to a MQTT Broker
- You have already connected to Tasmota's Access Point and configured the unit to connect to your local WiFi
- Under Configure Module, you selected "Sonoff Bridge (25)", saved and rebooted the device.
- You already know how to access your RF Bridge's Web Interface and Home Assistant
- Configured the RF Bridge to access the MQTT Broker and used "RFBridge" as the "TOPIC."
What we can do with Home Assistant
Unfortunately, with the bridge, Home Assistant isn't going to do the work for you and start detecting all your buttons, sensors on its own. So you will have to teach home assistant how to integrate these devices. Because the bridge is completely useless without at least one 433Mhz device, for this demonstration, I will be using a Push Button. I use these devices on my key chain and in various parts of the house because they are simple and I can teach them to do anything I want with Home Assistant.
The first thing you need to understand is that every 433Mhz device uses a "Code" and these codes will be unique to each device. Wireless Buttons or KeyFob's will generate a different code for each button on the controller. Door Sensors will have a code for when the door opens, and a different code for when the door is closed. Do you want a light to turn on when a key is pressed on a KeyFob or when a motion sensor detects motion or even a door sensor detects that a door has been opened?? Do you need these events to also send out another RF Code from the Bridge to turn on a 433Mhz Outlet? All this functionality can be simply handled through "Automations." Automations allow home assistant to respond to events and perform actions. The beauty of it all is the devices that you decide to control don't have to be 433Mhz Compatible. Home Assistant will do all the heavy lifting when it comes to talking to the various integrations that communicate with other Smart Devices in your home.
In this article, we are going to stick with Automations. They are simple to create and they have a lot of functionality. In the future, I will write up an article on how to create Binary Sensors in YAML, but that is beyond the scope of this article.
Obtaining the Codes
I recommend you open a Notepad or something on your computer to copy the codes to and what they are for. We will need these codes to configure the various automations that they will trigger. For this you will need to open a browser and access your Sonoff Bridge. Once you arrive at the main interface, click on Console:
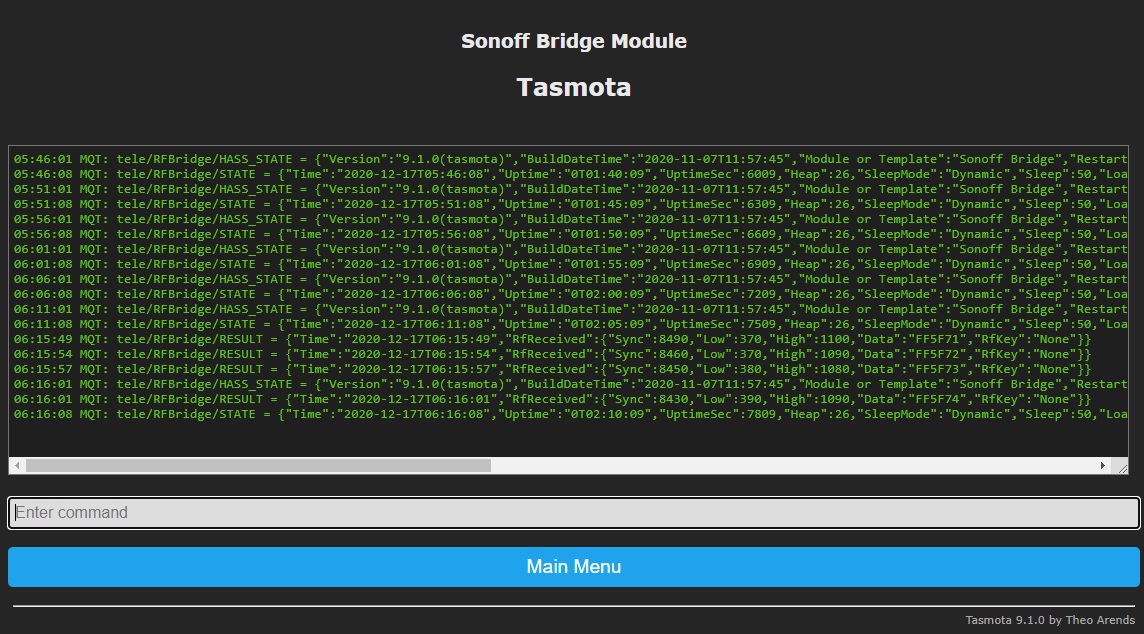
Once this screen comes up, you can begin pressing buttons on your controller. The code you are looking for is under Data on the RfReceived Packet as seen above...
06:15:49 MQT: tele/RFBridge/RESULT = {"Time":"2020-12-17T06:15:49","RfReceived":{"Sync":8490,"Low":370,"High":1100,"Data":"FF5F71","RfKey":"None"}}
06:15:54 MQT: tele/RFBridge/RESULT = {"Time":"2020-12-17T06:15:54","RfReceived":{"Sync":8460,"Low":370,"High":1090,"Data":"FF5F72","RfKey":"None"}}
06:15:57 MQT: tele/RFBridge/RESULT = {"Time":"2020-12-17T06:15:57","RfReceived":{"Sync":8450,"Low":380,"High":1080,"Data":"FF5F73","RfKey":"None"}}
06:16:01 MQT: tele/RFBridge/RESULT = {"Time":"2020-12-17T06:16:01","RfReceived":{"Sync":8430,"Low":390,"High":1090,"Data":"FF5F74","RfKey":"None"}}
On my controller, I pressed A,B,C,D on my KeyFob. A Button is FF5F71, B Button is FF5F72, C Button is FF5F73, and D Button is FF5F74. Now that we have the codes we need, let go teach home assistant to do something when one of these keys is pressed. So lets head over to Home Assistant. Click on Configuration and then Automations:
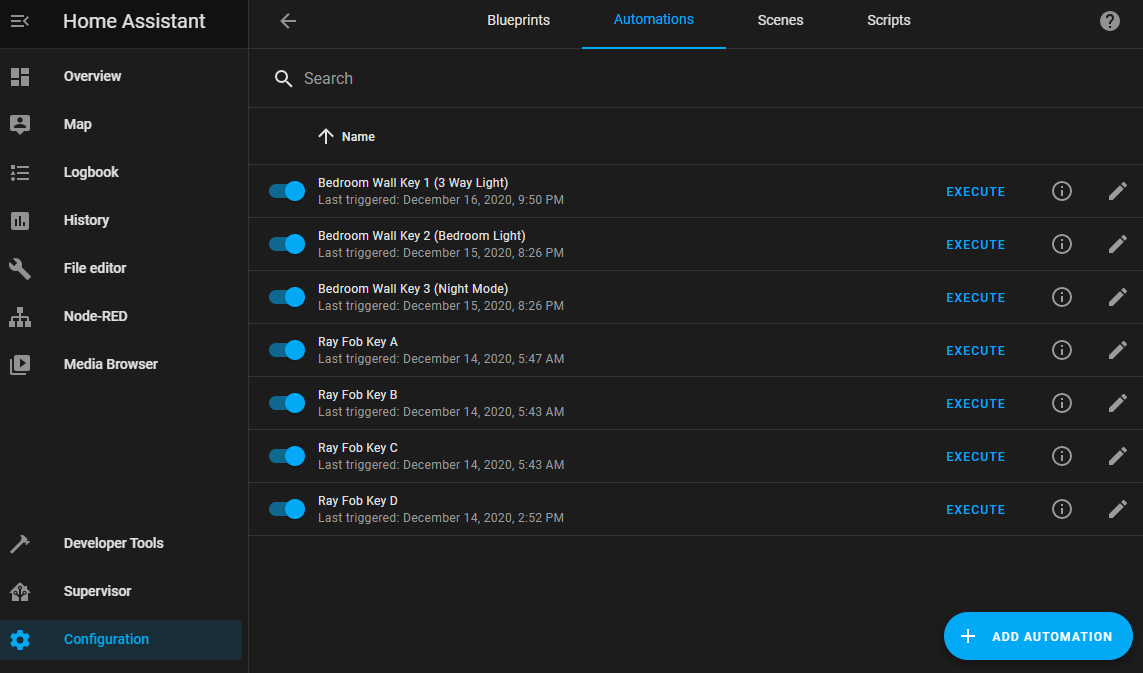
As you can see, I already have a few setup. Don't worry, yours will likely be empty. We will fix that here in a few minutes. I have an Automation defined for each key on each controller. This allows me to make a key do a series of things, or just 1 thing. I can also disable the automation which will in a sense disable the key on the KeyFob or Button on the wall. No ugly YAML, and very easy to setup. There is 2 ways to make this work.. One is kind of ugly, which is workable and I will show you in a moment. The other method is easy, however you will have to add 1 Rule on the RF Bridge. But this one rule will save you days of headache when you decide to create further automations or binary sensors in YAML (A article for another day). So lets "+ Add Automation" and start with the ugly way:
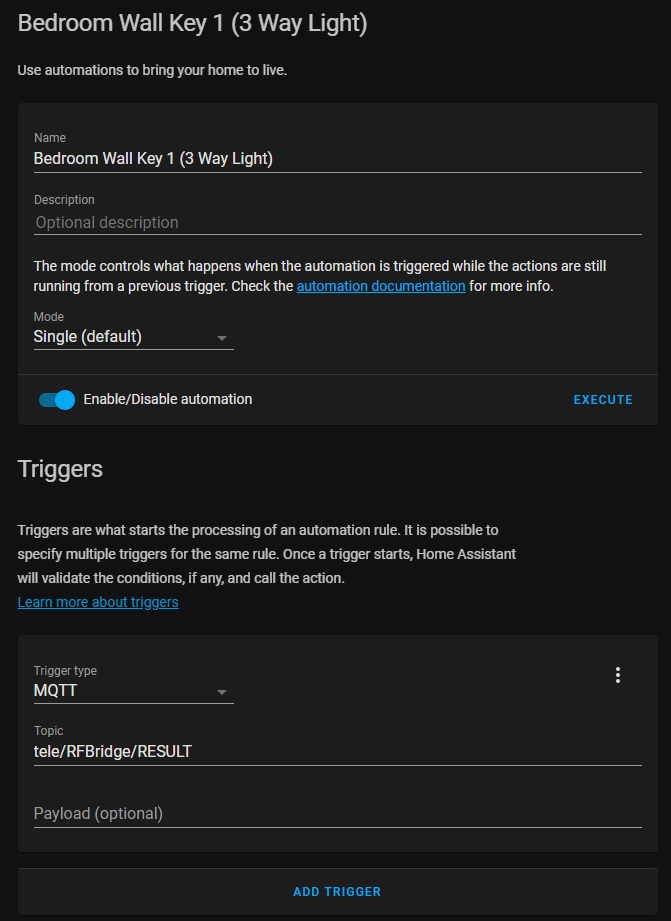
So you simply name the Automation, set the Trigger Type to MQTT and assign the topic. In this case the topic is "tele/RFBridge/RESULT" because we set the topic on the RFBridge during configuration of MQTT to RFBridge. If you picked a different name then you will have the change only the "RFBridge" part of that Topic. Here comes the ugly. We don't want to specify a Payload here because the result is being returned as JSON... So this rule passes every time a Message gets published to "tele/RFBridge/RESULT". In order to get the information we need, we need to create a template. This time a template condition to breakdown the JSON and get the "Data" we need. So once again through the magic of Screen Capture:
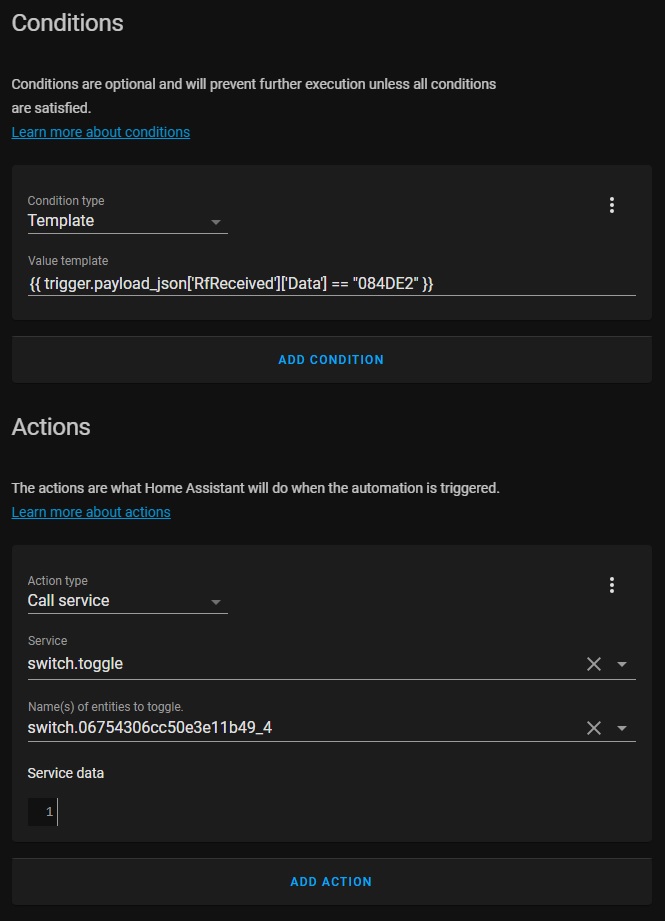
As you can see in the Template, we pull the value from the JSON "List" to extract the value and then compare it to the value we are looking for... There are 2 method of doing this:
{{ trigger.payload_json['RfReceived']['Data'] == "084DE2" }}

  OR

{{ trigger.payload_json.RfReceived.Data == "084DE2" }}
If you fail to add this Template, than any button will trigger the automation. This can have very undesireable results expecially if more than one automation doesn't have a template. Once this is defined, you can tell the Home Assistant the Action or Actions you want to perform... In most instances this will be switch.toggle or light.toggle depending on what the device is. The name of the entity to toggle along with the service are drop down menu's so you can easily select which integrated component you want to control. By selecting toggle, that means if the light or switch is already on, then turn it off. If the switch or light is already off, then turn it on. This makes it handy to assign one key for both functions. You can also assign more actions to the Automation... Maybe you are leaving and just want to press a button to turn off various lights in the house but also want turn the porch light on so when you return, you can see to get in. You can also use this Automation to call a scene or another automation that is already setup for something else. You can define a button to reload Home Assistant! :) Yeah, don't do that...
So what is the not Ugly way to do this? I'm glad you asked... With 1 Rule is Tasmota on the RF Bridge, you can extract the Data and Publish it seperately from the RESULT. This will allow us to assign the Key Data to the Payload under Trigger, eliminate the "Template" and go directly to the "Action." This will also help us later if we need to define binary sensors in YAML and eliminate all the template stuff there as well making a binary sensor very easy to define.
The Rule:
rule1 ON RfReceived#Data DO publish tele/RFBridge/KeyData %value% endon
rule1 1
The first rule simply says, if there is Key Data then Publish that "Value" seperately under "tele/RFBridge/KeyData". The second line turns the rule on. Don't worry, this change is perminate. This will survive between reboots, etc. Now that we have made this 1 little change. We can start defining Automations like this:
- Details
- Written by: Pumbaa2
- Category: Uncategorised
- Hits: 131
About Me:
I've always been into computers ever since I was a child... I started programming on Apple ][ Basic and moved on to Quick Basic on an IBM PC. I also took up an interest in building computers and customizing them. As an adult I moved on to Visual Basic 6 and wrote a number of programs on that platform for years... In my distaste for the crazy unreliable Windows Operating System at the time I started to venture out. In the early 2000's, I started messing with Linux... I moved through a number of distro's from RedHat, Mandrake, Fedora, etc. In the end, I settled on Slackware Linux. It was simple, to the point and gave me a brand new development environment to learn... Since then, I've written a number of basic C++ programs to handle various tasks (MD5 dupechecker, etc).
My original inspiration for Micro Controllers was from a friend who use to program PIC C84 Processors in ASM and C++. At the time I didn't have any equipment to do this kind of work. Pic Processors require a flash programmer and are kind of a pain to get working, usually requiring a RC circuit on the reset pin to get them to start. I didn't mess with the Micro Controllers for about 10 years until the BASIC Stamp. Shortly after that, Arduino kits started showing up on the market. Finally a chip that works well and is easy to program. I took quite a bit of my knowledge from GNU C++ to learn Arduino and I have to admit the learning curve was very quick. I was writing "sketch's" that would just about max out the available space on an AtMega328 ATMEL Processor pretty quickly... Since then newer processors have come to the market such as the STM32 and now the ESP32 that offer much more space and flexibility than the original Arduino controllers.
In my adventures to seek out newer hardware I started learning about "firmware" such as Tasmota that was capable of doing some of the stuff I was writing code for from scratch... My knowledge of Tasmota quickly lead me to the Home Assistant Community... My vast library of sensors and gadget's that I was using with Arduino became extremely easy to implement in Tasmota and the discovery of MQTT was a game changer... I didn't have to write a custom protocol for the NRF01 2.4Ghz Radio anymore, I had access to Micro Controllers that speak WiFi! This was an awesome change from coding a protocol from scratch and allows me to focus more on the job at hand vs writing custom communications code to work on a priopriatary transceiver..
I already had Google Assistant, Light Bulb's that change color, A "Hook Smart Hub", Chromecast Devices, etc. But my biggest issue with them is the Cloud Integration Platform. When the Internet goes out, everything stops working. I looked into solutions like ZigBee and Samsung Smart Things but found the prices to be way over the top. So integration of everything into Google Home became my solution for a while. I didn't need 10 apps to control all the various objects in the house and I could talk to a speaker or use Google Home to control them, awesome! At least now controlling everything is convient but the internet is still in the way, without it, my smart home is a dumb home.
I eventually ventured into a market for 433Mhz Devices. I had a Hook Smart Hub that would allow me to integrate everything into Google AND I could finally control everything locally. I have keychain fobs on my keys, I have 433Mhz buttons that stick to walls! However, the list of 433Mhz devices is small compared to rest of the market that is doing the WiFi Cloud thing. So again I was still limited on what functionality I wanted and a new possible security flaw. As I learned quickly with a 433Mhz Radio connected to an Arduino, the codes are recordable and replicatible with less than $10 in hardware if you know what you are doing. I wasn't to concerned that someone in my neighborhood was smart enough to turn my house into a disco club with their Arduino, but the possibility does exist. Also using a signal jammer opens up the possability that a door sensor or motion sensor may fail to send events along with the non-reporting of battery life that could also render such a device useless.
The kick starter project that eventually brought the "Hook Smart Hub"